The Ultimate Guide to Build a Dynamic Courses Directory Website with Next.js & TailwindCSS
Published on: 14th April 2025

Directory websites are becoming increasingly popular, and some experts predict that Google may prioritize them more in the future. With so much information available online, curated lists like directories help users quickly find the best resources in one place.
From tool directories to job boards and course listings, directory sites come in many forms. In this guide, I'll walk you through how to build your own directory website using Next.js, Node.js, Tailwind CSS and Flexy UI.
I have recently launched two listing sites, I'll share my step by step method to help you build one efficiently.
For UI components, I'll be using the FlexyUI library, but feel free to use any component library or custom design you prefer, data structure and logics to retrieve and show data will be same.
You can find the complete code and GitHub repository at the end.
Step #1: Set Up the Project
Let’s start by creating a Next.js project. Run this command in the terminal:
1npx create-next-app@latest
For styling, we will use Tailwind CSS V4.
At the time of writing this tutorial, Next.js installs an older version of Tailwind CSS, so select "No" in the terminal. We will install Tailwind CSS manually.

To install Tailwind CSS in next.js project, follow this official Tailwind guide.
Or just search on YouTube "Tailwind v4 in Next.js."
For icons, we are using the lucide-react icon library, you can easily replace the icons with your choice.
1npm i lucide-react
Now we are done with the installation, and your project is ready to start building the directory!
Step #2: Building the Home Page UI
Our home page UI will consist of the following components:
- Navbar
- Hero/Banner
- Section Heading
- Product Section
- FAQ Section
- Newsletter
- Footer
All these components and their multiple variations are available in the FlexyUI library. We chose FlexyUI because it is beautifully designed and responsive; we only have to copy and paste the code, no setup is required.
For the product card, I am using a minimal blog card UI and have created a ProductList component to render all the product cards.
You can also choose any of these React Tailwind UI libraries:
- Daisy UI
- Shadcn
- Material Tailwind
And here’s what your folder structure will look like:
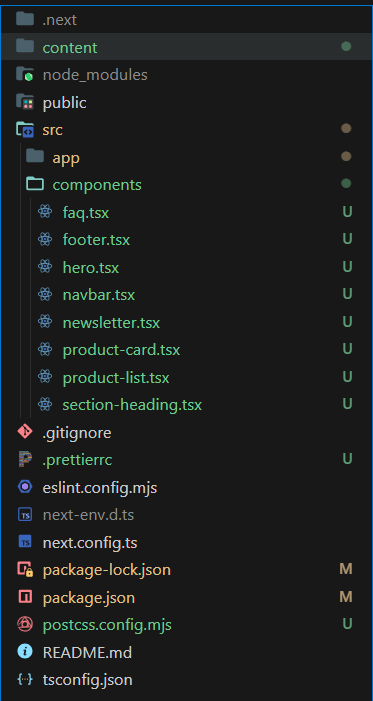
For UI components, I created a components folder inside src and added files for the UI components.
Once you've added these components, your home page UI will look similar to this:
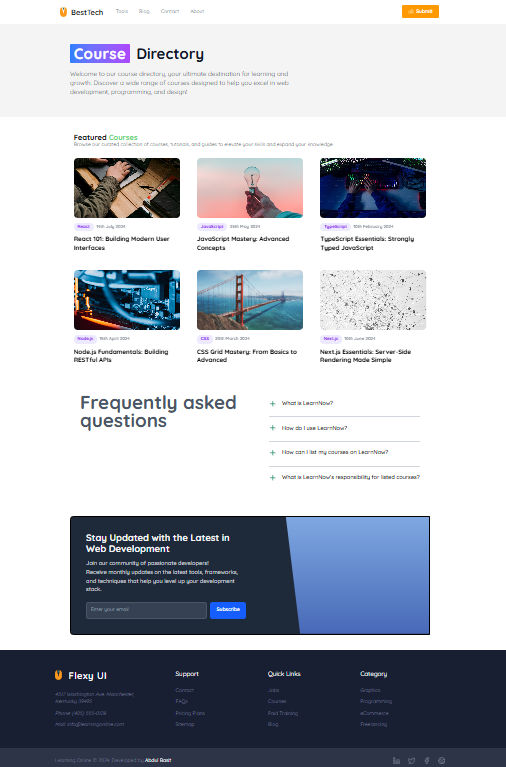
You can easily change your theme by selecting different variants of components.
Here’s an example of how your app/page.tsx file will be structured:
1import { posts } from '@/appData/courses'
2import { Faqs } from '@/appData/faqs'
3import Faq from '@/components/faq'
4import Footer from '@/components/footer'
5import Hero from '@/components/hero'
6import Navbar from '@/components/navbar'
7import Newsletter from '@/components/newsletter'
8import ProductList from '@/components/product-list'
9import SectionHeading from '@/components/section-heading'
10
11export default function Home() {
12  return (
13    <>
14      <header>
15        <Navbar />
16        <Hero
17          title={['Course', 'Directory']}
18          description="Welcome to our course directory, your ultimate destination for learning and growth. Discover a wide range of courses designed to help you excel in web development, programming, and design!"
19        />
20      </header>
21
22      <main>
23        <section className="mx-auto my-12 max-w-6xl px-3">
24          <SectionHeading
25            title={['Featured', 'Courses']}
26            subtitle="Browse our curated collection of courses, tutorials, and guides to elevate your skills and expand your knowledge."
27          />
28          <ProductList products={posts} />
29        </section>
30
31        <Faq items={Faqs} />
32        <Newsletter />
33      </main>
34
35      <Footer />
36    </>
37  )
38}
Note
FlexyUI components are built for React. In some components, you may need to adjust them for Next.js—for example, by using Next.js Image or Next.js Link. If you are using any hooks, include "use client" at the top.
Step #3: Organizing the Data
For the MVP, we’ll use JSON files to store the data for our directory. This approach can easily be switched to a cloud database later if needed. Another reason we choose JSON files is that we don't have to set up an admin panel or integrate an API.
Let's talk about the data:
Since we’re building a directory for courses available in different locations, to organize data we will create a folder at the root called content, and then create a courses folder inside it. In the courses folder, we will create JSON files for each course.
Tip
This structure is for organization. If we want to add blogs later, we can simply create a blogs folder inside content.
Here's a simple structure for our data:
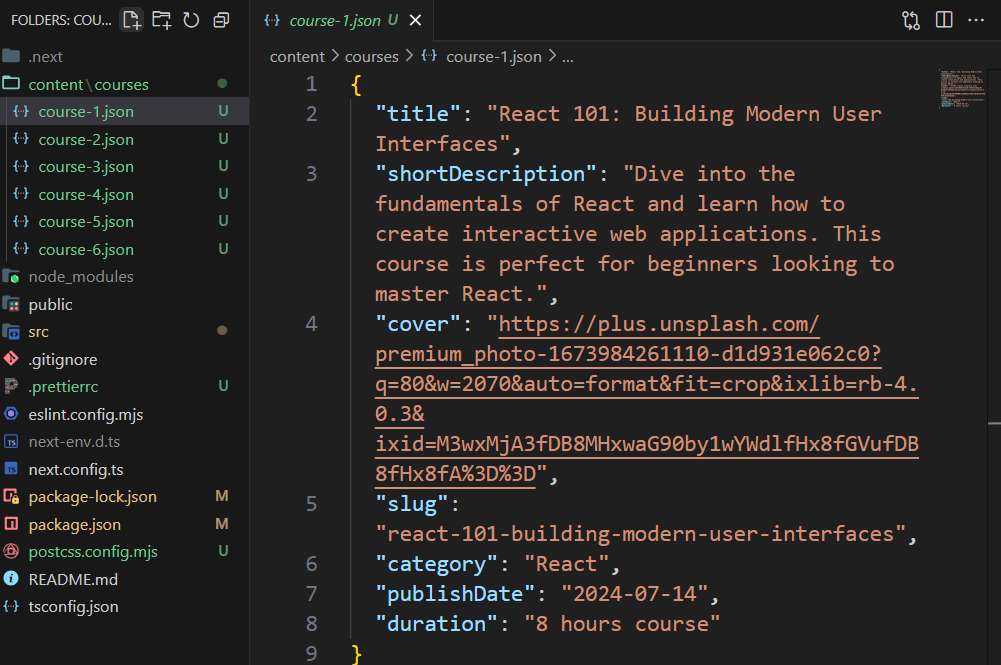
Course Data Structure (/content/courses/course-1.json):
1{
2  "title": "React 101: Building Modern User Interfaces",
3  "shortDescription": "Dive into the fundamentals of React and learn how to create interactive web applications. This course is perfect for beginners looking to master React.",
4  "cover": "https://plus.unsplash.com/premium_photo-1673984261110-d1d931e062c0?q=80&w=2070&auto=format&fit=crop&ixlib=rb-4.0.3&ixid=M3wxMjA3fDB8MHxwaG90by1wYWdlfHx8fGVufDB8fHx8fA%3D%3D",
5  "slug": "react-101-building-modern-user-interfaces",
6  "category": "React",
7  "publishDate": "2024-07-14",
8  "duration": "8 hours course",
9  "features": ["Live Classes", "Projects", "Certification", "Money", "Money Back Guarantee"]
10}
I replaced the JavaScript array of objects with JSON files and added 6 dummy courses.
This is how the folder structure will look like.
Step #4: Fetch Data from JSON Files in Next.js
To retrieve data, first create a services folder inside your app directory (some people call it lib). We'll use Node.js's fs and path modules.
Inside your services folder, create a file named courses.ts (or courses.js if you prefer JavaScript) and add the following functions to read the data:
1import { promises as fs } from 'fs'
2import path from 'path'
3
4export interface Course {
5  title: string
6  shortDescription: string
7  cover: string
8  slug: string
9  category: string
10  publishDate: string
11  duration: string
12}
13
14// Function to read a course file
15const readCourseFile = async (filePath: string): Promise<Course> => {
16  const fileData = await fs.readFile(filePath, 'utf8')
17  return JSON.parse(fileData) as Course
18}
19
20// Function to get all courses
21export const getAllCourses = async (): Promise<Course[]> => {
22  try {
23    const coursesPath = path.join(process.cwd(), 'content/courses')
24    const courseFiles = await fs.readdir(coursesPath)
25
26    const courses = await Promise.all(
27      courseFiles.map(async (fileName) => {
28        const filePath = path.join(coursesPath, fileName)
29        return await readCourseFile(filePath)
30      }),
31    )
32
33    return courses
34  } catch (error: unknown) {
35    // Handle errors
36    console.error('Error:', error)
37    return []
38  }
39}
To verify that the above logic is working, simply call this function in page.tsx and console log the data:
1import { getAllCourses } from '@/services/courses'
2
3export default async function Home() {
4  const courses = await getAllCourses()
5  console.log('courses', courses)
6
7  return <>{/* Your home page components */}</>
8}
Now, check the terminal to see if the courses data is being logged correctly.
Step #5: Make the Home Page Dynamic
Now that the UI, content, and API (the function to fetch data) are ready, it's time to make the home page dynamic by displaying data from the getAllCourses function.
In app/page.tsx, call the getAllCourses function and pass the data to the ProductList component:
1import { getAllCourses } from '@/services/courses'
2import Footer from '../components/footer'
3import ProductList from '../components/product-list'
4import SectionHeading from '../components/section-heading'
5// rest of the imports
6
7export default async function Home() {
8  const courses = await getAllCourses()
9
10  return (
11    <>
12      <header>...</header>
13
14      <main>
15        <section className="mx-auto my-12 max-w-6xl px-3">
16          <SectionHeading
17            title={['Featured', 'Courses']}
18            subtitle="Browse our curated collection of courses, tutorials, and guides to elevate your skills and expand your knowledge."
19          />
20          <ProductList products={courses} />
21        </section>
22        ...
23      </main>
24
25      <Footer />
26    </>
27  )
28}
If you're following along, congrats! We've completed the first part of our Next.js directory website.
Step #6: Build the Course Details Page UI
Now we have to build individual pages for each course, we call it details page. When a user clicks on a particular course, they should see all of its details. We’ll use dynamic routes in Next.js to achieve this.
1. Folder Structure
For course details pages we will create a dynamic route. First, create a [courses] folder inside the src/app directory. Inside the [courses] folder, create two files: page.tsx and layout.tsx.
This is how your folder structure should look:
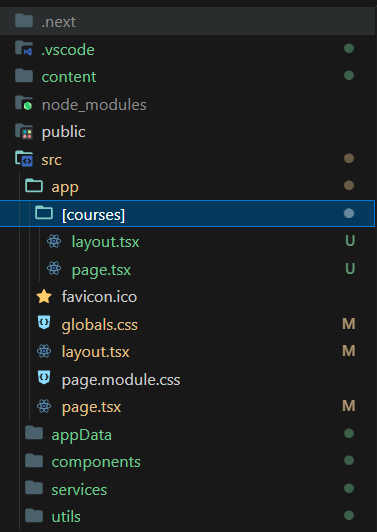
The layout.tsx file allows you to define a common layout for all course details pages including Metadata, while page.tsx is the dynamic route that renders the details for each course based on its slug.
2. Building the Course Details Page UI
For the course details page, we will use these UI components:
- Header – To display the course title.
- Button – For actions like "Enroll Now".
- List – To show course modules or features.
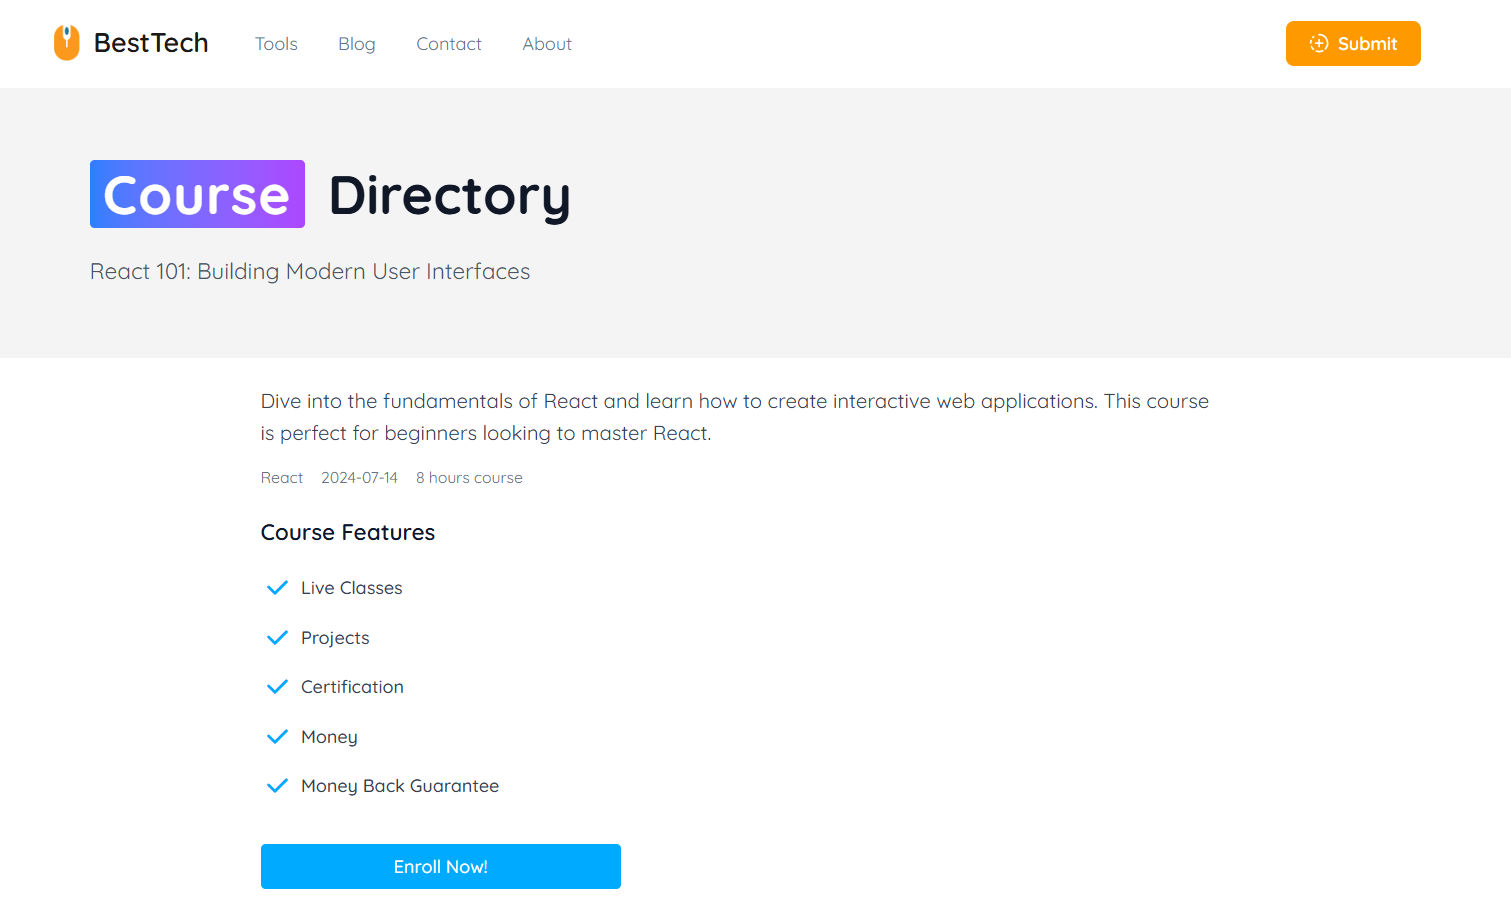
1import Button from '@/components/button'
2import Hero from '@/components/hero'
3import Lists from '@/components/lists'
4
5const course = {
6  title: 'React 101: Building Modern User Interfaces',
7  shortDescription:
8    'Dive into the fundamentals of React and learn how to create interactive web applications. This course is perfect for beginners looking to master React.',
9  cover:
10    'https://plus.unsplash.com/premium_photo-1673984261110-d1d931e062c0?q=80&w=2070&auto=format&fit=crop&ixlib=rb-4.0.3&ixid=M3wxMjA3fDB8MHxwaG90by1wYWdlfHx8fGVufDB8fHx8fA%3D%3D',
11  slug: 'react-101-building-modern-user-interfaces',
12  category: 'React',
13  publishDate: '2024-07-14',
14  duration: '8 hours course',
15  features: ['Live Classes', 'Projects', 'Certification', 'Money', 'Money Back Guarantee'],
16}
17
18export default function CourseDetailsPage() {
19  return (
20    <>
21      <Hero
22        title={['Course', 'Directory']}
23        description="React 101: Building Modern User Interfaces"
24      />
25
26      <main className="mx-auto max-w-4xl p-6">
27        <article>
28          <p className="mb-4 text-lg text-gray-700">{course.shortDescription}</p>
29
30          {/* Course Meta */}
31          <div className="mb-6 flex flex-wrap gap-4 text-sm text-gray-500">
32            <span>{course.category}</span>
33            <span>{course.publishDate}</span>
34            <span>{course.duration}</span>
35          </div>
36        </article>
37
38        {/* Course Features */}
39        <section>
40          <Lists title="Course Features" items={course.features} />
41        </section>
42
43        {/* Enroll Button */}
44        <footer className="mt-10">
45          <Button>Enroll Now!</Button>
46        </footer>
47      </main>
48    </>
49  )
50}
This UI will display a header with the course title, a description, an enrollment button, and a list of course features/modules.
3. Fetch Individual product/course function
As you have seen above, the course details page data is static. We need to make it dynamic.
To fetch an individual course, add a function in your services/courses.ts file that accepts a slug and retrieves the course details from your API (json files).
1export const getOneCourse = async (slug: string): Promise<Course | null> => {
2  try {
3    const courses = await getAllCourses()
4    const course = courses.find((course) => course.slug === slug)
5
6    return course || null
7  } catch (error: unknown) {
8    console.error('Error:', error)
9
10    return null
11  }
12}
4. Making the Course Detail Page Dynamic
In this step, we invoke the getOneCourse function to fetch data for a specific course based on its slug. This approach dynamically generates the course detail page, ensuring that each page displays the correct course information. If no matching course is found, an appropriate message is shown to the user.
1import Button from '@/components/button'
2import Hero from '@/components/hero'
3import Lists from '@/components/lists'
4import { getOneCourse } from '@/services/courses'
5
6interface CourseDetailsPageProps {
7  params: {
8    courses: string
9  }
10}
11
12export default async function CourseDetailsPage({ params }: CourseDetailsPageProps) {
13  const course = await getOneCourse(params.courses)
14
15  if (!course) {
16    return <p className="mt-10 text-center">Course not found</p>
17  }
18
19  return (
20    <>
21      <Hero title={['Course', 'Directory']} description={course.title} />
22
23      <main className="mx-auto max-w-4xl p-6">
24        <article>
25          <p className="mb-4 text-lg text-gray-700">{course.shortDescription}</p>
26
27          {/* Course Meta */}
28          <div className="mb-6 flex flex-wrap gap-4 text-sm text-gray-500">
29            <span>{course.category}</span>
30            <span>{course.publishDate}</span>
31            <span>{course.duration}</span>
32          </div>
33        </article>
34
35        {/* Course Features */}
36        <section>
37          <Lists title="Course Features" items={course.features} />
38        </section>
39
40        {/* Enroll Button */}
41        <footer className="mt-10">
42          <Button>Enroll Now!</Button>
43        </footer>
44      </main>
45    </>
46  )
47}
5. Layout.tsx File Course details
What it does?
- Generate metadata for SEO purposes
- Update the placeholder values as needed for your Course Details page
- It provides a consistent structure with a Navbar, main content area, Newsletter, and Footer
1import Footer from '@/components/footer'
2import Navbar from '@/components/navbar'
3import Newsletter from '@/components/newsletter'
4import { Metadata } from 'next'
5
6export async function generateMetadata(): Promise<Metadata> {
7  const title = 'Course Details - Coursify'
8  const description =
9    'Discover comprehensive course details and start your learning journey with Coursify.'
10  const url = 'https://yourdomain.com/courses'
11
12  const metadata: Metadata = {
13    title,
14    description,
15    alternates: {
16      canonical: url,
17    },
18    openGraph: {
19      title,
20      description,
21      url,
22      siteName: 'Coursify',
23      type: 'website',
24    },
25    twitter: {
26      title,
27      description,
28      card: 'summary_large_image',
29      creator: '@Basit_Miyanji',
30    },
31  }
32
33  return metadata
34}
35
36interface LayoutProps {
37  children: React.ReactNode
38}
39
40export default function Layout({ children }: LayoutProps) {
41  return (
42    <>
43      <Navbar />
44      <main>{children}</main>
45      <Newsletter />
46      <Footer />
47    </>
48  )
49}
Step #7: Generate Static Pages for Better Performance
To make your site faster and SEO-friendly, you’ll want to pre-render pages statically. Use the generateStaticParams method in Next.js:
1export async function generateStaticParams() {
2  const courses = await getAllCourses()
3  return courses.map((course) => ({ course: course.slug }))
4}
Directory GitHub Repo
You can find the complete code in the GitHub repository for the Next.js Directory Site Starter.
Step #8: Optimize SEO and Add Open Graph Tags
Before launching, ensure your site is optimized for search engines. Add metadata and Open Graph tags in the layout.tsx of each page.
Step #9: Add Sitemap and Analytics
Make sure to create a robots.txt file and a sitemap for better SEO. You can also integrate Google Analytics and Search Console to track traffic.
Step #10: Deploy the Site
Once you’ve completed the development, it’s time to deploy your site. Platforms like Vercel or Netlify make deployment super easy.
Extras
If you want to add more features, consider adding categories or filters to your directory. This will help users narrow down the options based on specific criteria.
Once you start getting visitors,
Level Up Your Project:
- Add AI-powered search with Algolia
- Implement user reviews system
- Add price comparison system
Pro Tip
Start with niche directories - 'Next.js Developers in Berlin' converts better than generic 'Web Developers' listings.
Your Turn!
I've shared the exact blueprint I used to launch two directories. Which niche will you dominate? contact me via email if you have question or looking for help!
If you learned something new, feel free to share your progress with me. I’d love to create more content that helps you build real-world projects!